
How to Type in Urdu
🔤 Try It: Urdu Phonetic Quick Reference
Click any English letter to see its Urdu equivalent, or type English letters in the box to convert them live:
Selected: —
Tip: this is a quick demo. For full typing, enable the Urdu keyboard in your device settings as explained below.
Learning How to Type in Urdu is easier than many beginners expect. You do not need advanced computer skills or special training. Most modern devices already support the Urdu language and include tools that help you start quickly. With the right Urdu keyboard, you can write Urdu in documents, emails, social media posts, and messaging apps. Whether you use a Windows PC, Mac, Android phone, or iPhone, the basic setup takes only a few minutes. This beginner-friendly guide explains each step in simple language. You will learn how to enable an Urdu keyboard, switch between languages, and begin Urdu typing with confidence. By the end, you will know how to type in Urdu on your favorite device without confusion.

What You Need Before You Start Typing in Urdu
Before you start, make sure your device is ready for Urdu typing. A few simple checks can save time and prevent setup issues.
Choose a Device You Want to Type On
You can type in Urdu on almost any modern device. Use a Windows PC or laptop for work and study. If you own a Mac, Android phone, iPhone, or tablet, you can also type in the Urdu language with ease. Each device offers built-in options to add new languages and switch between keyboards. The steps may look different, but the process remains simple.
Make Sure an Urdu Keyboard Is Available
Most devices already support the Urdu language through their Language settings and Keyboard settings. Windows, macOS, Android, and iOS let you add an Urdu keyboard in just a few steps. If your device does not include it by default, you can download the language pack or keyboard from the official settings or app store. After installation, the keyboard works without an internet connection. Once you enable it, you can switch between English and Urdu whenever you need to type.
How to Select an Urdu Keyboard
After you confirm that your device supports Urdu, the next step is to add the language. Most computers, phones, and tablets include this option in their settings. Open your device settings and look for Language or Keyboard options. From there, choose Add a language and select Urdu from the list. Your device will install the required files if they are not already available. Once the setup finishes, it will add the Urdu keyboard to your available keyboards. This process takes only a few minutes on most devices. You only need to complete it once unless you reset your device.
Add Urdu as a Language
Adding Urdu makes it available whenever you want to type. It does not replace your current language. Instead, it adds another typing option. Most devices let you keep multiple languages at the same time. After you enable the Urdu keyboard, you can use both English and Urdu without changing your device’s main language.
Switch from English to Urdu
After you add the keyboard, switching languages becomes easy. Look for the language selector or keyboard icon on your screen. A single tap or click lets you choose Urdu. Some devices also provide a dedicated key or shortcut for keyboard switching. When the Urdu keyboard becomes active, you can start typing immediately. You can switch keyboard language back to English anytime with the same option.
How to Type in Urdu on Windows
Windows makes Urdu typing simple. Both Windows 11 and Windows 10 include built-in support for the Urdu language. You only need to add the keyboard once. After that, you can switch between English and Urdu whenever you want.
Open Language Settings
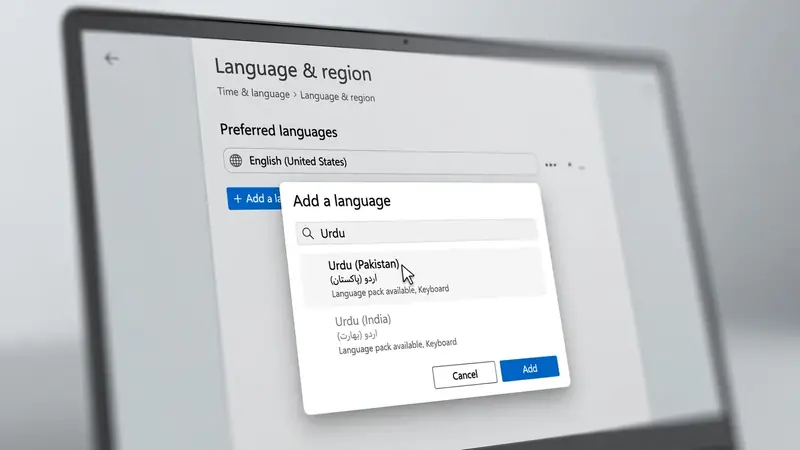
Click the Start button and open Settings. Select Time & Language and then choose Language & Region on Windows 11 or Language on Windows 10. This section lets you manage the languages and keyboards installed on your computer. If you do not see Urdu, you can add it in the next step.
Install the Urdu Keyboard
Click Add a language and search for Urdu. Select it from the list and continue with the installation. Windows downloads the required language files if they are missing. Keep your internet connection on during this step. The setup usually finishes within a few minutes. After installation, Windows adds the Urdu keyboard to your available input languages. Microsoft recommends managing language packs through the Windows Settings app to ensure proper compatibility.
Switch to Urdu
Look for the language indicator on the taskbar, usually near the clock. It may display ENG or another language code. Click it and select Urdu. You can also use the keyboard shortcut Windows + Spacebar to switch between installed languages. The language indicator changes to show that the Urdu keyboard is active.
Start Typing in Urdu
Open Microsoft Word, Notepad, or any web browser. Place the cursor where you want to type and begin entering text. Your computer now accepts Urdu input instead of English. You can write emails, create documents, fill out online forms, or send messages with the same keyboard. When you need English again, switch back using the language indicator or the same keyboard shortcut.
How to Type in Urdu on Mac
If you use a Mac, you can type in Urdu without installing extra software. macOS includes built-in support for multiple languages, including Urdu. Once you add the keyboard, you can switch between English and Urdu whenever you need.
Add Urdu Input Source
Click the Apple menu and open System Settings. Select Keyboard, then choose Text Input or Input Sources, depending on your macOS version. Click Edit or Add Input Source and search for Urdu. Select it and confirm your choice. macOS adds the Urdu keyboard to your available input methods. Apple recommends adding languages through Input Sources to ensure smooth typing across all apps.
Change Keyboard Language
After adding Urdu, open the Menu Bar at the top of the screen. Click the input menu and choose Urdu from the list of available keyboards. You can switch back to English at any time using the same menu. This makes changing languages quick and simple.
Begin Typing
Open any app, such as Pages, Notes, Mail, or your favorite web browser. Click where you want to enter text and start typing in Urdu. Your Mac uses the selected input source automatically. When you finish, switch back to English from the Menu Bar and continue typing as usual.
How to Type in Urdu on Android
Android phones make Urdu typing simple. Most devices already include a keyboard app, and you can add Urdu in just a few steps. Once you enable the language, you can use it in almost every app on your phone.
Install or Open Your Keyboard App
First, check which keyboard app your phone uses. Many Android devices come with Gboard, while others use Microsoft SwiftKey or another keyboard. Open your phone’s Settings and go to System, Languages, or Keyboard, depending on your device. If your keyboard app is not installed, download Gboard or Microsoft SwiftKey from the official app store. Both apps support Urdu and offer a simple setup process.
Enable Urdu Language
Open your keyboard settings and look for the Languages option. Tap Add Keyboard or Add Language, then choose Urdu from the list. Confirm your selection to enable the Urdu keyboard. The keyboard becomes available immediately after setup. You only need to complete this step once.
Start Typing in Any App
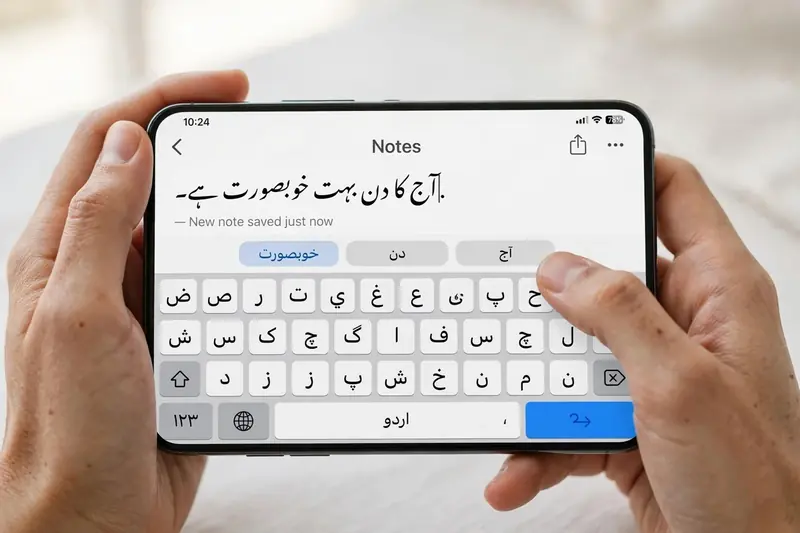
Open any app where you want to write, such as WhatsApp, Messages, Chrome, or Notes. Tap the text field to display the keyboard. Use the language button or globe icon to switch from English to Urdu. Then start typing normally. Your keyboard stays in Urdu until you switch back to English. This makes it easy to chat, search the web, write notes, or complete online forms in the Urdu language.
How to Type in Urdu on iPhone
Typing in Urdu on an iPhone is quick because iOS includes built-in support for many languages. You do not need extra software to get started. Once you add the Urdu keyboard, you can switch between English and Urdu in any app.
Add Urdu Keyboard
Open the Settings app and tap General. Next, select Keyboard and then Keyboards. Tap Add New Keyboard and scroll through the list until you find Urdu. Select it to add the keyboard to your iPhone. The Apple Keyboard saves your choice, so you only need to complete this setup once. Apple recommends using the built-in keyboard settings to manage language options and keep your device fully compatible with future iOS updates.
Switch Between Languages
Open any app that displays the keyboard. Tap the globe icon or press and hold it to see your installed languages. Choose Urdu from the list. You can switch back to English the same way whenever you need. Changing languages takes only a second.
Start Typing
Open apps like Messages, Notes, Mail, or Safari and tap any text field. Once the Urdu keyboard is active, begin typing your text normally. The selected language stays active until you switch to another keyboard. This makes it easy to send messages, write documents, search the web, or create notes in the Urdu language on your iPhone.
Basic Urdu Typing Process for Beginners
Now that your Urdu keyboard is ready, you can follow the same basic steps on almost any device. The process stays simple whether you use a computer, phone, or tablet. First, open the app where you want to write. This could be a document editor, a web browser, a messaging app, or a note-taking app. Next, select the Urdu keyboard if it is not already active. Use the language selector, keyboard icon, or globe icon to switch from English to Urdu.
Place the cursor in the text field and begin typing. Enter your words one character at a time, just as you would with any other language. As you type, check your text to make sure it appears correctly on the screen. If you need English again, switch back using the same language option. Before you finish, read your message or document once more. Correct any mistakes if needed. Then send your message, save your document, or continue writing. After a few attempts, typing in Urdu becomes easier and feels more natural on every device.
Common Problems When Typing in Urdu
Most beginners complete the setup without any issues. If something does not work, a few simple checks usually solve the problem.
Urdu Keyboard Doesn’t Appear
If you cannot find the Urdu keyboard, check your device settings again. Make sure you added Urdu to your installed keyboards. If it is still missing, restart your device and check the keyboard list one more time.
Can’t Switch Languages
If your device stays on English, confirm that more than one keyboard is installed. Look for the language selector, keyboard icon, or globe icon on the screen. Tap or click it to switch from English to Urdu.
Urdu Text Doesn’t Display Correctly
If the text looks incorrect, make sure the Urdu keyboard is active before you type. Also, check that the app supports the Urdu language. Most modern apps and browsers display Urdu correctly without extra settings. If the problem continues, update your device to the latest software version.

Frequently Asked Questions
How do I type in Urdu on my laptop?
First, add the Urdu keyboard through your laptop’s language settings. Then switch from English to Urdu using the language selector. After that, open any app and start typing.
Can I type Urdu without downloading software?
Yes. Most modern devices include built-in support for the Urdu language. You usually only need to enable the Urdu keyboard in your settings. If your device does not include it, download it from the official source.
Can I switch between English and Urdu?
Yes. Windows, macOS, Android, and iOS let you switch between installed languages at any time. Use the language selector, keyboard icon, or globe icon to change keyboards in seconds.
Does Windows already include an Urdu keyboard?
Yes. Windows 11 and Windows 10 provide built-in support for the Urdu language. You simply need to add the Urdu keyboard from the language settings before you start typing.
Can I type Urdu on Android and iPhone?
Yes. Both Android and iPhone support Urdu typing. Add the Urdu keyboard in your keyboard settings, switch to it when needed, and begin typing in apps like Messages, Notes, browsers, and other supported applications.
Conclusion
Learning How to Type in Urdu is simple once you complete the initial setup. Install the Urdu keyboard, switch your device to the Urdu language, and open any app where you want to write. Whether you use Windows, macOS, Android, or an iPhone, the basic process remains easy to follow. After a few minutes of practice, switching between English and Urdu becomes natural. You can write messages, create documents, browse the web, and communicate with confidence. Follow the steps in this guide whenever you set up a new device, and enjoy typing in Urdu with ease.
Related Guides
- Urdu Typing Lessons: Complete Beginner to Advanced Learning Guide
- Urdu Phonetic Keyboard
- Urdu Typing Test
Try our free Urdu Keyboard tool to type Urdu online instantly.